Introduction
The aim of this article is describe the process of deploying Sentinel instances to multiple environments* in Azure using Bicep for Infrastructure as Code. We’ll walkthrough creating and onboarding the Sentinel instance as well as adding diagnostic settings to capture Sentinel Logs in a Log Analytics workspace.
*in this demo separate environments refers to different resource groups – but this could be applied at the subscription level if you so choose
Assumptions
- An Azure Tenant
- A User with Contributor permissions on the subscription we will be deploying Sentinel
- Visual Studio Code with the Bicep extension installed
- The az cli installed
The Project structure
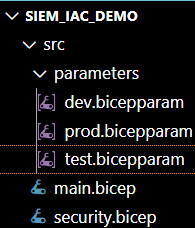
- security.bicep: The module file for Sentinel IaC configuration
- main.bicep: The bicep entry point file where the module bicep files are run
- {dev}/{test}/{prod}.bicepparam: a bicep parameter files – typically there is one file per environment being deployed to
security.bicep
This is a bicep module file where all the configuration for SIEM (Sentinel) is held. It also includes input parameters for dynamic settings that can be passed in from the main.bicep file.
//Parameters
@description('Specifies the location for all resources.')
@allowed([
  'uksouth'
])
param location string

@description('Specifies the SKU name for the workspace.')
@allowed([
  'PerGB2018'
  'Standard'
])
param skuName string = 'PerGB2018'

@description('Specifies the log retention in days.')
@minValue(30)
@maxValue(730)
param retentionInDays int = 90

@description('Log analytics workspace name')
param log_analytics_workspace_name string

@description('Sentinel diagnostic settings name')
param diagnostic_settings_name string

//Resources

//The log analytics workspace sentinel will sit on top of
resource law_workspace 'Microsoft.OperationalInsights/workspaces@2022-10-01' = {
  name: log_analytics_workspace_name
  location: location
  properties: {
    sku: {
      name: skuName
    }
    retentionInDays: retentionInDays
  }
}

//The Sentinel instance
resource sentinel 'Microsoft.OperationsManagement/solutions@2015-11-01-preview' = {
  name: 'SecurityInsights(${log_analytics_workspace_name})'
  location: location
  properties: {
    workspaceResourceId: law_workspace.id
  }
  plan: {
    name: 'SecurityInsights(${log_analytics_workspace_name})'
       product: 'OMSGallery/SecurityInsights'
       promotionCode: ''
       publisher: 'Microsoft'
  }
}

//Onboarding the Sentinel instance to the log analytics workspace
resource onboarding_state 'Microsoft.SecurityInsights/onboardingStates@2023-02-01-preview' = {
  name: 'default'
  scope: law_workspace
}

//The Sentinel diagnostic settings to capture Sentinel activity in the Log analytics workspace
resource diagnosticsSettings 'Microsoft.Insights/diagnosticSettings@2021-05-01-preview' = {
  scope: law_workspace
  name: diagnostic_settings_name
  properties: {
    workspaceId: law_workspace.id
    logs: [
      {
        categoryGroup: 'audit'
        enabled: true
      }
      {
        categoryGroup: 'allLogs'
        enabled: true
      }
    ]
    metrics: [
      {
        enabled:true
        category: 'AllMetrics'
      }
    ]
  }
}

//Output parameters to echo the state of the resources once built
output workspaceId string = law_workspace.id
output workspaceName string = law_workspace.name
output solutionId string = sentinel.id
output solutionName string = sentinel.name
*.bicepparams files
The environment specific variable values. Below is an example taken from the development environment dev.bicepparam file. The test.bicepparam and prod.bicepparam files will look the same albeit with environment specific values. Note the using reference to the main.bicep file – this tells the parameter file where to pass its values into when the main.bicep file is executed.
using '../main.bicep'

param location = 'uksouth'
param resource_group_name = 'rg-logging-dev-uks-01'
param log_analytics_workspace_name = 'sent-law-logging-dev-uks-01'
param diagnostic_settings_name = 'diagsetting-dev-uks-01'
main.bicep
This is the entry point file that the security.bicep (module) and *.bicepparam(s) files feed into. The main.bicep file is the file referenced when running the bicep script.
//As we are creating the resource group we run this at //Subscription scope level
targetScope = 'subscription'

//Parameters
param resource_group_name string

@description('law workspace name.')
param log_analytics_workspace_name string

@description('Specifies the location to deploy all resources')
@allowed([
  'uksouth'
])
param location string

@description('Specifies the SKU name for the log analytics workspace.')
@allowed([
  'PerGB2018'
  'Standard'
])
param skuName string = 'PerGB2018'

@description('Specifies the log retention in days')
@minValue(30)
@maxValue(730)
param retentionInDays int = 90

@description('Sentinel diagnostic settings name')
param diagnostic_settings_name string

//Resources
//Create resource group
resource resourceGroup 'Microsoft.Resources/resourceGroups@2021-04-01' = {
  name: resource_group_name
  location: location
}

//Run the security.bicep module to create the Sentinel //instance and associated support resources
module security 'security.bicep' = {
  scope: resourceGroup
  name: 'security'
  params: {
    retentionInDays: retentionInDays
    skuName: skuName
    location: location
    log_analytics_workspace_name: log_analytics_workspace_name
    diagnostic_settings_name: diagnostic_settings_name
  }
}
Building the resources – running the Bicep/IaC scripts
Now we can run the code to build the Sentinel instance. Before you can run the code within VS Code you will need to connect to your Azure tenant and select the correct Subscription. You can run the below command inside a terminal window to login to your Tenant and follow the instructions;
az loginOnce you have logged into your tenant and selected the correct subscription you can run the below code to run the main.bicep file.
As a rule of thumb I always run the script first time around with the –what-if tag at the end of the command. This will initially build a report of what resources are going to be unmodified/updated/created when you run the script proper.
az deployment sub create -l uksouth --template-file .\src\main.bicep --parameters dev.bicepparam --what-ifNote the –parameters dev.bicepparam reference. This will initially build the Sentinel instance for the development environment. To build resources for the test and prod environments just swap the dev.bicepparam reference out for test.biceparam or prod.bicepparam respectively.
Once you are happy with the report output having previously applied the –what-if tag. run the build command to build the resources;
az deployment sub create -l uksouth --template-file .\src\main.bicep --parameters dev.bicepparamSummary
We have been through the process of describing the file structure and configuration of Bicep files when building Azure Sentinel instances using IaC
We also described how to run the files on our local machine using VS Code and how to switch between parameter files when targeting specific deployment environments.
Going forward I will write a post on how to build the same IaC using Azure Devops for CI/CD
Thanks for reading and happy building!
Leave a Reply